Introduction
RabbitMQ – a software message broker – is an open source application that supports various messaging protocols, such as AMQP, MQTT, STOMP and others.
If your application needs to be deployed in multiple geographic locations, it becomes very difficult to maintain a single cluster for all locations. This problem can be solved by using RabbitMQ Federation plugin: you can support multiple independent RabbitMQ clusters and forward messages between clusters without much trouble.
Using Federation Plugin
There are 2 types of federation which are configured at the moment of creation:
- federation exchange. Used to send a message to another server/cluster. In this case, messages that are published on federated RabbitMQ will be published on the local exchange server and subsequent servers. Use case: when it is needed to send the same message to several locations;
- federation queue. The main task of this type is intelligent message load balancing, messages will be sent only to downstream servers, while consumers will only receive (consume) messages. In this case, messages are not duplicated. It can be used for distributing load between servers.
When working with Federation plugin, servers are divided on 2 types:
- Upstream – servers where messages are published.
- Downstream – servers to which messages are forwarded.
Installing Federation Plugin
For installation, it is necessary to run the command (if running on Linux, you should run the command as superuser):
rabbitmq-plugins enable rabbitmq_federation rabbitmq_federation_management
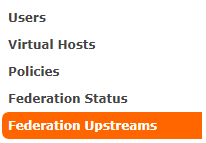
After that, you need to restart RabbitMQ, and on the Web UI new items will appear in the Admin menu:
Figure 1: Installing Federation Plugin
Setting Up
To set up a federation, the following conditions should be met:
- minimum 2 RabbitMQ servers;
- federation plugin is enabled;
- access to port 5672 is open.
As in the case with shovel, to create federation you can use:
- rabbitmqctl utility;
- Rest API;
- Web UI.
Let’s take Web UI and REST API as an example.
The first step is to create a queue, exchange on both servers and specify routing to link them. It is not necessary for the local and remote servers to have the same virtual hosts (vhosts) on which queue and exchange are created.
Creating with Web UI
After that, on the Downstream server go to the menu Admin > Federation Upstreams. To do that, fill in the required fields Name and URI. URI can be set in several formats. For example, you can use: amqp://<user>:<password>@<IP/DNS_name>/<vhost>. Also, as in the case with the Shovel plugin, when creating, you can specify the message confirmation mode: on-confirm, on-publish or no-ack.
 Figure 3: Federation Upstreams
Next, you need to create the policies object. To do that, go to Admin > Policies.
Specify any name in the Name field.
In the Pattern field specify a regular expression that will determine which exchanges (queues) will need to be processed. If it is needed to process all existing exchanges or queues, enter – “.*”.
In Apply to field select what should be processed, exchange/queue or all together.
In Definition field specify federation-upstream-set and all as the value.
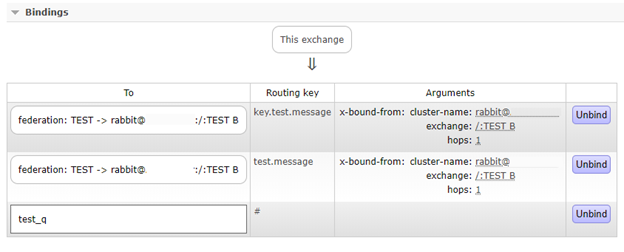
If after that you go to Upstream server, you can see that federation exchange was created:
In exchange TEST, federation is specified as a link. And now during message’s publishing it will go to both servers for processing.
Creating with REST API
On the Downstream server you will need to make several PUT requests.
- Create federation upstream. You need to send a request to the address /api/policies/{{virtual_host}}/{{policie_name}} with the following content:
{
“value”:{
“uri”:”amqp://user:resu@192.168.1.87/host_3″,
“expires”:3600000,
“ack-mode”: “on-confirm”,
“prefetch-count”: 100
}
} - Create a policy. To do that, send a request to the address /api/policies/{{virtual_host}}/{{policie_name}} with the following content:
{
“pattern”:”^TEST*.”,
“definition”:{
“federation-upstream-set”:”all”
},
“priority”:0,
“apply-to”:”exchanges”
}
After executing requests, you can check the status of work on the Web UI. To do that, go to Admin > Federation Status, where you can see the federation work status:
Now, if you send a message on the Upstream server, it will be forwarded to the Downstream:
Conclusion
In this article, we demonstrated an example of creating a federation for two RabbitMQ clusters. But this doesn’t mean that more clusters cannot be linked. Configuring the plugin is simple and convenient enough, but it is most important not to forget that there are 2 federation types. When using exchange, messages will be duplicated on both clusters, so it is important to keep this in mind when building application architecture. Federation can be conveniently used together with the Shovel plugin, where the former will be collecting data from geographically distanced clusters, and the latter will be forwarding messages within the cluster.


