
Introduction
The purpose of the article is to describe Robot Framework, show the field of its applying and advantages of using it on the project, and also to share the approaches, which were used in practice.
Robot Framework description
Robot Framework (further, RF) is an open-source framework, based on Python, which represents the extensible automation testing platform for end-to-end acceptance testing and acceptance testing driven development (ATDD). It can be used to test distributed, heterogeneous applications that require testing of several technologies and interfaces. Test scripts are written using keyword testing techniques and recorded in table format.
Advantages of Robot Framework using
- Keyword Driven Testing (KDT) approach: having keywords in hand, test development can be carried out by a QA specialist without skills or with minimal programming skills.
- A variety of internal libraries: for RF there are over 40 different libraries, if the functionality of the existing libraries is not enough, you can implement and connect your own library.
- Native RIDE development environment. In addition, if necessary, it is possible to use plugins to work in the IDE and some text editors.
- Convenient and detailed logs with test results: you can get a lot of information from them in case of problems with the tests.
- Large and active community: answers to many questions can be obtained quite quickly throughout the day.
- Plugins for Jenkins, Maven, Ant: facilitate the process of integration with CI, simplify deployment in Java.
- Ability to integrate with test management systems (TestRail and TestLink) using Listener.
Drawbacks of using Robot Framework
- There is no parallel test run. Improvements in this area are currently underway.
- Only work with Python 2.7 is supported. This drawback may be insignificant if the work is done in Java. Also, at the moment, the entire Robot Framework is being actively redesigned for Python 3.
- BDD requires writing your own libraries.
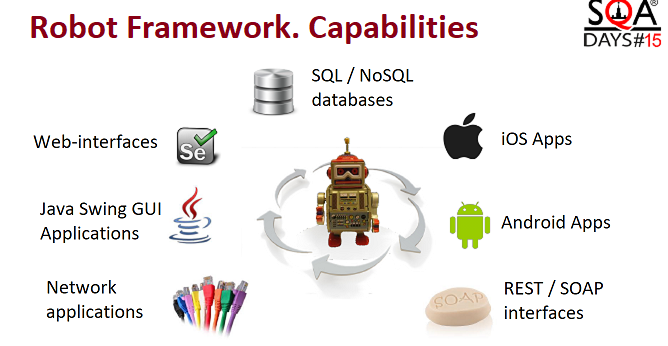
RF using is well reflected in the following illustration, thanks to SQA Days
Approaches of Test Creation in Robot Framework
Keyword Driven Testing is a representation of test scripts expressed in syntactic units of the language – keywords, which can correspond to an atomic action (mouse click, keystroke, etc.) or represent entire scripts that perform more complex actions.
Several keywords can be combined into actions. As a result, we are able to express test scenarios at a high and, most importantly, understandable to anyone level of abstraction. At the same time, one or several developers can engage in the development of keywords, and everyone can use the results, including specialists without in-depth knowledge of programming. It’s easy enough to create a script that will check, for example, creating a client:
Add Customer ${customerId}
Check Client Exists ${customerId}
Test-driven development (TDD) is an approach to development and testing, in which tests, that the code must satisfy, are first created and only then the code is implemented.
Behavior-driven development (BDD) is an evolution of the TDD approach to development and testing, in which special attention is paid to the behavior of the product in terms of business. Such tests check various scenarios that are interesting directly to the customer.
In this regard, in the preparation of such tests, frameworks which have a syntax that ensures readability of tests not only by the developer, but also by customer representatives are often used.
And since RF forms understandable logs, in which you can see each atomic action and track expected actions – this will be one of the criteria why it is worth using it.
But, as was noted above, in native libraries, the necessary functions may be missing or the available functionality will not be enough to perform testing. Then you can independently implement the necessary functionality in the form of your library. For example, in our case, we did not have enough functionality when working with the database, so we implemented the necessary functionality in Java code, which was connected as a library to the project.

IDE for work with Robot Framework
- RIDE. It is own IDE for working with RF, the installation is simple and clear, there may be issues while installing on a 64-bit version of the OS, but everything is solved by installing the corresponding version of wxPython. In addition, in this environment, you can conveniently debug tests.
- Eclipse plugin. I can’t say anything about the convenience and stability of work in Eclipse, because the main IDE is IntelliJ IDEA, but maybe it will come in handy for someone.
- Sublime plugin. The installation of the plugin will be described below in the text of the article.
- IntelliBot. A fairly convenient plugin, but the last update was more than 2 years ago (06/01/2016).
- Robot plugin. I can’t say anything remarkable, the last update was a few years ago.
- Robot Framework Support. I used just this plugin, everything is convenient and understandable, and most importantly – updates arrive.
- Run Robot Framework file. It is used to run a test from the context menu. Unfortunately, I haven’t faced it.
Plugin installing in Sublime Text 3
In order for .robot syntax highlighting to appear in Sublime Text, you need to:
- If Sublime Text is not installed, download it here.
- Launch Sublime Text and call the plugin management console using Ctrl+ or in the menu “View> Show Console menu”.
- Execute a Python script that will add support Package Control.sublime-package.
- Call the command line to control the ctrl+shift+p plugins and enter Package Control: Install Package.
- In the window that opens, look for Robot Framework Assistant.
- Restart Sublime Text and enjoy the result:
Test run and work with tests in Java
I want to share how we ran RF tests in conjunction with Java, I will try to reflect some points of use that may come in handy, using the Maven project as an example.
- At first, we added RobotFramework and Javalib-core dependencies of the required version in pom.xml. After that, in Java, the development of keyword methods was carried out. Meanwhile, the keywords were most often related to the business logic of the tested product, which means they were unique, but there was duplication of functions existing in standard libraries.
- The structure of the project is as follows:
./
├───library – all the project libraries are stored;
├───resource – custom configuration, file with import of libraries;
├───run – a directory with scripts and test execution results;
├───test – directory with .robot files (tests);
└───variable – static variables.
To run it, the following script was used:

- The import of methods was implemented through an auxiliary file, which indicated what libraries and variables are connected:

- The run was already carried out using a script:run -s %suite_name% or run -t %test_name%
- After that, we received a ready-made report as a html page that can be opened in any browser and either enjoy the results or puzzle over why everything isn’t working and most importantly – who broke everything.
Robot Framework and CI integration
Jenkins
Integration with Jenkins should not be a problem due to the fact that there is a plug-in that simplifies integration.
- You should add Robot Framework Plugin into Jenkins.
- Add configuration to run tests. RF has a useful function: the ability to restart failed tests, and since in practice a certain number of tests can be unstable, due to various problems, we implemented a bash script which is needed to restart failed tests:
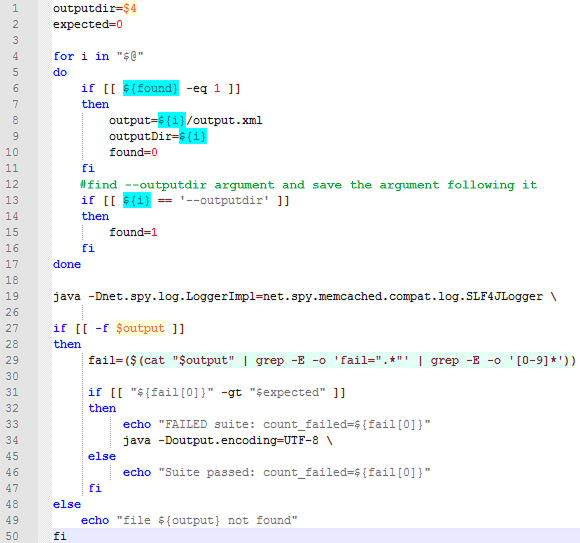
What happens in this script:
- We check the command line attributes and save the name of the target directory in the $outputDir variable – this solution was used due to the fact that different numbers of suites or tests can be run in the same Job and the sequence number of the argument with the target directory may differ in different cases.
- We run the tests (hidden lines 19-25).
- We get the number of failed tests from the xml file with the results, if the number is different from 0, we restart the failed tests. Then we merge the results of an additional run with the main one (hidden lines 34-44). It is worth noting: there is an error in the plugin, which is why the number of successful tests may not coincide with the actual number in Jenkins on the results page.
3. Select Publish Robot Framework Result in the step after the build and specify the directory with output.xml file:

4. Run the tests and wait for the end. At the same time, when trying to view the report in Linux systems, it is very likely to get the following result instead of the report:

You shouldn’t be scared, the whole point is that at the system level you cannot run scripts, and the report file itself contains a great number of scripts. To fix this problem, just open Jenkins script console and run:
System.setProperty(“hudson.model.DirectoryBrowserSupport.CSP”,”sandbox allow-scripts; default-src ‘none’; img-src ‘self’ data: ; style-src ‘self’ ‘unsafe-inline’ data: ; script-src ‘self’ ‘unsafe-inline’ ‘unsafe-eval’ ;”)
This solution will work till the first server restart. If a constant solution is necessary, it would be better to put in the environment variable settings:
JENKINS_JAVA_OPTIONS=”-Djava.awt.headless=true -Dhudson.model.DirectoryBrowserSupport.CSP= “
or to add to the <arguments> section in jenkins.xml file
“-Dhudson.model.DirectoryBrowserSupport.CSP=”default-src ‘self’; script-src ‘*’; connect-src ‘*’; img-src ‘*’; style-src ‘*’;”
TeamCity
Setting up should not cause any difficulties either:
- The report should be generated in the form of xunit, for this it is necessary to run tests with the flag -x% report_name% .xml.
- In the project settings: Build Features-> XML report processing -> Ant Junit -> specify the path to the generated report.
Read more in the article.
I’d note that RF reports can be integrated into any CI system if it supports JUnit publishing.
Conclusions
Robot Framework is a fairly powerful and not too difficult to use tool that, when used correctly, can achieve impressive results with little or no additional cost. When comparing it with other frameworks, it may seem that it is heavy, clumsy and uncomfortable.
But is there an ideal project that will suit everyone, and at the same time will not be overloaded? The undoubted advantage of using RF, I believe, is the presence of a large number of libraries and the active community.
Take a closer look at it, who knows, maybe it will come in handy for your project as well. With proper use, of course, otherwise you can start hammering nails with a microscope. But this is the topic for another article.
Useful links
- Robot documentation – http://robotframework.org/robotframework/#user-guide
- Wiki on code.google – https://code.google.com/archive/p/robotframework/wikis/DocumentationIndex.wiki
- Running tests in parallel – https://github.com/mkorpela/pabot